We’ll start with the XAMLs for this project. Although this is actually a straight forward task, there are a couple of issues that one should keep an eye on.
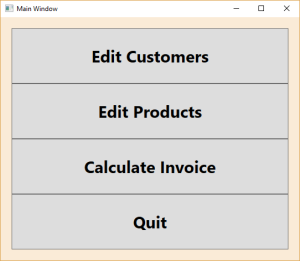
As a reminder – this is what we want:
You could now start with a window and put the buttons in there. But it’s a better approach to put (almost) everything in UserControls. UserControls can be used everywhere – in Windows, in Pages, in other Controls, in Templates etc., so this is a much more flexible approach.
That brings up the first suggestion:
Suggestion #1: Put (almost) everything in UserControls
And there is another reason: When you start working with DataTemplates, you will recognize that you can’t preview them in Visual Studio, simply because you’re just defining a template and not a control or a window, so there’s actually nothing to visualize. When you put your XAML in a UserControl you can edit the UserControl instead of the DataTemplate and change the DataTemplate to simply use the UserControl. You’ll see how this works.
So, let’s start with a new UserControl; name it MainMenuPage. Put a stack panel and four buttons in it:
<UserControl x:Class="SimpleMVVM.MainMenuPage"
             xmlns="http://schemas.microsoft.com/winfx/2006/xaml/presentation"
             xmlns:x="http://schemas.microsoft.com/winfx/2006/xaml"
             xmlns:mc="http://schemas.openxmlformats.org/markup-compatibility/2006"
             xmlns:d="http://schemas.microsoft.com/expression/blend/2008"
             xmlns:local="clr-namespace:SimpleMVVM"
             mc:Ignorable="d"
             d:DesignHeight="300" d:DesignWidth="300">
    <StackPanel Orientation="Vertical">
        <Button Content="Edit Customers"/>
        <Button Content="Edit Products"/>
        <Button Content="Calculate Invoice"/>
        <Button Content="Quit" />
    </StackPanel>
</UserControl>
To be able to test this control, put it in the main window:
<Window x:Class="SimpleMVVM.MainWindow"
        xmlns="http://schemas.microsoft.com/winfx/2006/xaml/presentation"
        xmlns:x="http://schemas.microsoft.com/winfx/2006/xaml"
        SizeToContent="WidthAndHeight"
        xmlns:View="clr-namespace:SimpleMVVM"
        WindowStartupLocation="CenterScreen"
        Title="Main Window">

    <View:MainMenuPage/>
</Window>
That looks like this:
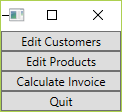
But we want a couple of things to be different: a colored background, bigger font size, bigger buttons, etc.
We could now put these properties in the attributes of the buttons. That would look like this (in the worst case):
<StackPanel Orientation="Vertical">
    <Button Content="Edit Customers" Width="500" Height="100" FontSize="30" FontWeight="Bold"/>
    <Button Content="Edit Products" FontSize="30" FontWeight="Bold" Width="500" Height="100" />
    <Button Content="Calculate Invoice" FontWeight="Bold" Width="500" FontSize="30" Height="100" />
    <Button Content="Quit" FontSize="30" Height="100" FontWeight="Bold" Width="500" />
</StackPanel>
That looks very messy. And it will be lot of work if you’d want to change the font size for example. (And you will have to change it because customers constantly change things…)
This is the next suggestion:
Suggestion #2: Use Styles and Templates from the beginning
While it is a little more work to define styles instead of putting attributes directly in the XAML files, it will pay off in the long run, because centralized styles are very easy to change. The other thing is that XAMLs get very messy over time, if you put everything in attributes. And it really speeds up prototyping when you can rely on a set of standard styles and don’t have to think of styling all the time.
Putting the style into the App.xaml…:
<Style TargetType="Button" x:Key="MainMenuButton">
    <Setter Property="Width" Value="500" />
    <Setter Property="Height" Value="100" />
    <Setter Property="FontSize" Value="30" />
    <Setter Property="FontWeight" Value="Bold" />
</Style>
…and referencing this style in the stack panel…:
<StackPanel Orientation="Vertical">
    <Button Content="Edit Customers" Style="{StaticResource MainMenuButton}"/>
    <Button Content="Edit Products" Style="{StaticResource MainMenuButton}"/>
    <Button Content="Calculate Invoice" Style="{StaticResource MainMenuButton}"/>
    <Button Content="Quit" Style="{StaticResource MainMenuButton}"/>
</StackPanel>
…looks a lot nicer.
We’re almost there. The “AntiqueWhite” background is still missing (and the padding).
Put a border around the control…:
<Window x:Class="SimpleMVVM.MainWindow"
        xmlns="http://schemas.microsoft.com/winfx/2006/xaml/presentation"
        xmlns:x="http://schemas.microsoft.com/winfx/2006/xaml"
        xmlns:d="http://schemas.microsoft.com/expression/blend/2008"
        xmlns:mc="http://schemas.openxmlformats.org/markup-compatibility/2006"
        SizeToContent="WidthAndHeight"
        xmlns:View="clr-namespace:SimpleMVVM"
        WindowStartupLocation="CenterScreen"
        mc:Ignorable="d"
        Title="MainWindow" >

    <Border Style="{StaticResource ContentBorder}">
        <View:MainMenuPage />
    </Border>
</Window>
…and define a style in App.xaml for it:
<Style TargetType="Border" x:Key="ContentBorder">
    <Setter Property="Padding" Value="20" />
    <Setter Property="Background" Value="AntiqueWhite" />
</Style>
That’s it for now.
Next step: SimpleMVVM, Part 2: The product edit and customer edit pages