In this part we’ll build the XAMLs for the two edit windows. They are fairly similar so we can create them in one go.
Remember, this is what the edit customer page should look like:
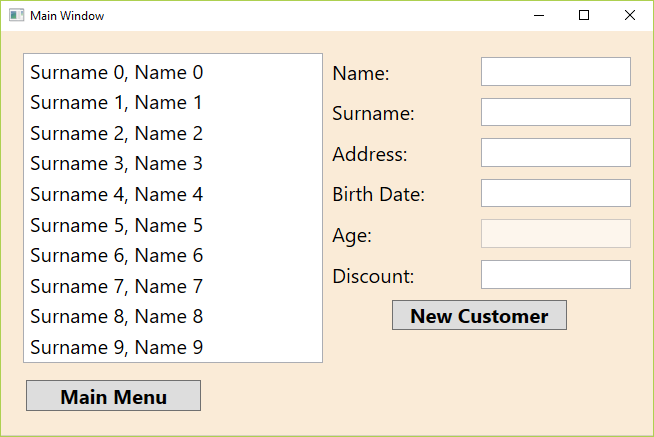
We’ll build the page with a UniformGrid with two columns – the ListBox left and the TextBoxes right. We do not implement the „Main Menu“ button yet! This will be part of the main window.
Create a new UserControl and name it EditCustomerPage. Create a UniformGrid with two columns:
<UserControl x:Class="SimpleMVVM.EditCustomerPage"
             xmlns="http://schemas.microsoft.com/winfx/2006/xaml/presentation"
             xmlns:x="http://schemas.microsoft.com/winfx/2006/xaml"
             xmlns:mc="http://schemas.openxmlformats.org/markup-compatibility/2006"
             xmlns:d="http://schemas.microsoft.com/expression/blend/2008"
             mc:Ignorable="d"
             d:DesignHeight="300" d:DesignWidth="300">
    <UniformGrid Columns="2">
    </UniformGrid>
</UserControl>
Put a ListBox in the left column and a Grid with 7 rows and 2 columns in the right column:
<UserControl x:Class="SimpleMVVM.EditCustomerPage"
             xmlns="http://schemas.microsoft.com/winfx/2006/xaml/presentation"
             xmlns:x="http://schemas.microsoft.com/winfx/2006/xaml"
             xmlns:mc="http://schemas.openxmlformats.org/markup-compatibility/2006"
             xmlns:d="http://schemas.microsoft.com/expression/blend/2008"
             mc:Ignorable="d"
             d:DesignHeight="300" d:DesignWidth="300">
    <UniformGrid Columns="2">
        <ListBox Grid.Column="0" />
        <Grid Grid.Column="1">
            <Grid.RowDefinitions>
                <RowDefinition Height="Auto" />
                <RowDefinition Height="Auto" />
                <RowDefinition Height="Auto" />
                <RowDefinition Height="Auto" />
                <RowDefinition Height="Auto" />
                <RowDefinition Height="Auto" />
                <RowDefinition Height="Auto" />
                <RowDefinition Height="Auto" />
            </Grid.RowDefinitions>
            <Grid.ColumnDefinitions>
                <ColumnDefinition Width="*" />
                <ColumnDefinition Width="*" />
            </Grid.ColumnDefinitions>
        </Grid>
    </UniformGrid>
</UserControl>
Insert the Labels and TextBoxes according to the screen shot:
<UserControl x:Class="SimpleMVVM.EditCustomerPage"
             xmlns="http://schemas.microsoft.com/winfx/2006/xaml/presentation"
             xmlns:x="http://schemas.microsoft.com/winfx/2006/xaml"
             xmlns:mc="http://schemas.openxmlformats.org/markup-compatibility/2006"
             xmlns:d="http://schemas.microsoft.com/expression/blend/2008"
             mc:Ignorable="d"
             d:DesignHeight="300" d:DesignWidth="300">
    <UniformGrid Columns="2">
        <ListBox Grid.Column="0" />
        <Grid Grid.Column="1">
            <Grid.RowDefinitions>
                <RowDefinition Height="Auto" />
                <RowDefinition Height="Auto" />
                <RowDefinition Height="Auto" />
                <RowDefinition Height="Auto" />
                <RowDefinition Height="Auto" />
                <RowDefinition Height="Auto" />
                <RowDefinition Height="Auto" />
                <RowDefinition Height="Auto" />
            </Grid.RowDefinitions>
            <Grid.ColumnDefinitions>
                <ColumnDefinition Width="*" />
                <ColumnDefinition Width="*" />
            </Grid.ColumnDefinitions>

            <Label Content="Name:" Grid.Column="0" Grid.Row="0" />
            <Label Content="Surname:" Grid.Column="0" Grid.Row="1" />
            <Label Content="Address:" Grid.Column="0" Grid.Row="2" />
            <Label Content="Birth Date:" Grid.Column="0" Grid.Row="3" />
            <Label Content="Age:" Grid.Column="0" Grid.Row="4" />
            <Label Content="Discount:" Grid.Column="0" Grid.Row="5" />

            <TextBox Grid.Column="1" Grid.Row="0" />
            <TextBox Grid.Column="1" Grid.Row="1" />
            <TextBox Grid.Column="1" Grid.Row="2" />
            <TextBox Grid.Column="1" Grid.Row="3" />
            <TextBox Grid.Column="1" Grid.Row="4" IsEnabled="False" />
            <TextBox Grid.Column="1" Grid.Row="5" HorizontalContentAlignment="Right" />
            <Button Grid.Column="0" Grid.ColumnSpan="2" Grid.Row="6" Content="New Customer" />
        </Grid>
    </UniformGrid>
</UserControl>
Note: The text box for the age should be read only – it will be calculated. The text box for the discount should be right aligned, and the „New Customer“ button should stretch over the two columns.
You might have noticed that the page looks quite different from what we expected. The font is too small, the TextBoxes don’t really fit etc.
It’s time for a couple of styles – you remember Suggestion #2? Use styles!
Put new styles for the Labels and TextBoxes in the App.xaml file:
<Application x:Class="SimpleMVVM.App"
             xmlns="http://schemas.microsoft.com/winfx/2006/xaml/presentation"
             xmlns:x="http://schemas.microsoft.com/winfx/2006/xaml"
             StartupUri="MainWindow.xaml">
    <Application.Resources>

        <Style TargetType="Button" x:Key="MainMenuButton">
            <Setter Property="Width" Value="500" />
            <Setter Property="Height" Value="100" />
            <Setter Property="FontSize" Value="30" />
            <Setter Property="FontWeight" Value="Bold" />
        </Style>

        <Style TargetType="Border" x:Key="ContentBorder">
            <Setter Property="Padding" Value="20" />
            <Setter Property="Background" Value="AntiqueWhite" />
        </Style>

        <Style TargetType="Label">
            <Setter Property="FontSize" Value="20" />
            <Setter Property="VerticalAlignment" Value="Center" />
            <Setter Property="MinWidth" Value="150" />
            <Setter Property="Margin" Value="2" />
        </Style>

        <Style TargetType="TextBox">
            <Setter Property="FontSize" Value="20" />
            <Setter Property="VerticalAlignment" Value="Center" />
            <Setter Property="MinWidth" Value="150" />
            <Setter Property="Margin" Value="2" />
        </Style>
    </Application.Resources>
</Application>
Now turning to the product edit page – this is how it should look like:
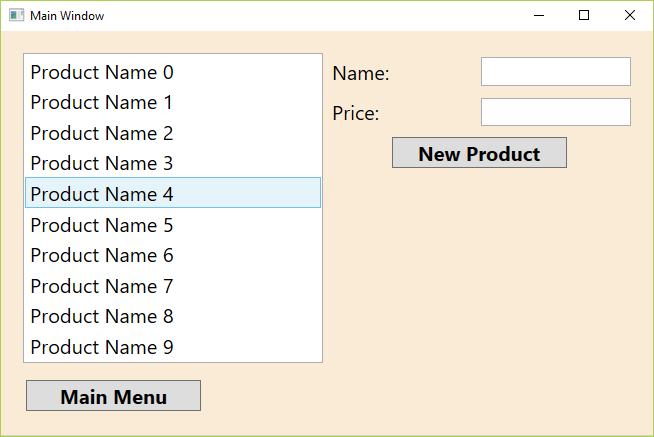 Since it’s almost the same as the edit customer page you could copy most of the XAML. So, create a new UserControl, name it EditProductPage and insert the UniformGrid, ListBox and Labels and TextBoxes:
<UserControl x:Class="SimpleMVVM.EditProductPage"
             xmlns="http://schemas.microsoft.com/winfx/2006/xaml/presentation"
             xmlns:x="http://schemas.microsoft.com/winfx/2006/xaml"
             xmlns:mc="http://schemas.openxmlformats.org/markup-compatibility/2006"
             xmlns:d="http://schemas.microsoft.com/expression/blend/2008"
             mc:Ignorable="d">
    <UniformGrid Columns="2">
        <ListBox Grid.Column="0" MinHeight="300">
        </ListBox>
        <Grid Grid.Column="1">
            <Grid.RowDefinitions>
                <RowDefinition Height="Auto" />
                <RowDefinition Height="Auto" />
                <RowDefinition Height="Auto" />
                <RowDefinition Height="Auto" />
                <RowDefinition Height="Auto" />
            </Grid.RowDefinitions>
            <Grid.ColumnDefinitions>
                <ColumnDefinition Width="*" />
                <ColumnDefinition Width="*" />
            </Grid.ColumnDefinitions>

            <Label Content="Name:" Grid.Column="0" Grid.Row="0" />
            <Label Content="Price:" Grid.Column="0" Grid.Row="1" />

            <TextBox Grid.Column="1" Grid.Row="0" />
            <TextBox Grid.Column="1" Grid.Row="1" HorizontalContentAlignment="Right" />
            <Button Grid.Column="0" Grid.ColumnSpan="2" Grid.Row="2" Content="New Product" />
        </Grid>
    </UniformGrid>
</UserControl>
Now where we’ve got the first three pages we will build the basic view model system, so we can connect everything.